

How To Repair A Leak In Pvc Drain Pipe For Shower That Has No Acess To It ?
Find and Repair Hidden Plumbing Leaks
Updated: Jun. eleven, 2022
Find and set minor drips before they crusade major impairment

Nosotros show unproblematic ways to detect and stop common water leaks before they cause rot and other expensive impairment. Y'all'll notice about of them around bathtubs and showers, drains, sinks and toilets.
You might likewise similar: TBD
- Time
- Complexity
- Cost
- An hour or less
- Beginner
- Less than $twenty
Tub and Shower: Splash Leaks

Exam a shower door
Splash water all around a shower door. If water seeps out from behind the frame, caulk the frame on the within. Run a new bead forth the floor/tub joint.
Splash leaks are only water escaping past a shower drape or a shower door. Plumbers tell us it's the well-nigh common type of bathroom leak. Although it may sound minor, this leak causes major harm when water seeps into the subfloor where flooring meets the tub or shower. Before long the vinyl floor or tiles begin to loosen. Even worse, the plywood subfloor delaminates and rots, requiring a huge, expensive tearout and replacement project.
Signs of problem:
- Curling vinyl flooring or loose tiles adjacent to the tub.
- Peeling paint or flaking, chalky-looking wood end near the shower.
- Water stains on the ceiling or joists below.
- Mold spots on the wall or flooring near the tub or shower.
- If you use a curtain, look for standing water on the flooring after yous shower.
How to notice the source of a bathtub bleed leaking:
- If you have a shower door, splash water all around the door and frame. Leaks around the frame may accept v minutes or longer to show upwardly.
- If the door has safety gaskets or a rubber door sweep, cheque them for gaps.
- Too cheque for whatsoever gaps in the caulk where the shower or tub meets the floor.
How to fix a leaking tub drain:
- Exist sure to overlap sliding doors correctly when you close them. The inner door should be closest to the faucet.
- If y'all accept a shower curtain rather than a door, brand sure you close information technology completely when y'all shower, or add together a splash baby-sit.
- Seal a leaking frame by running a small-scale bead of tub and caulk effectually the within of the frame. Force the caulk into any gaps between the frame and the shower environs. Speedily wipe away all the backlog caulk. When the caulk dries, test for leaks again.
- Supersede whatsoever worn gaskets or door sweeps. Bring the old one to a abode center or plumbing supply shop and look for a matching replacement (be certain to go the right size to fit).
- If the old caulk along the floor shows gaps, scrape it out and run a new bead.
Homeowner story:
"I noticed the floor tile along the tub was coming loose. I pushed on it and information technology crunched down into the underlayment, which was totally rotten. We ended up replacing all of the tile and part of the subfloor."
Figure A: Tub and Shower Leaks
The nearly damaging tub and shower leaks occur when water splashes out of the enclosure. Tile and drain leaks can likewise cause major damage.
Tub and shower: Drain leaks
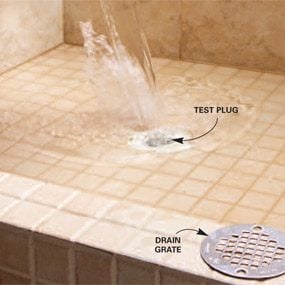
Photo 1: Examination a drain
Plug the drain with a test plug and add h2o. Later an hr, cheque to see if the water level has dropped.
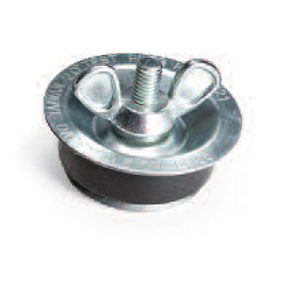
Photo 1A: Close-up of test plug
Mensurate the bleed diameter and buy a test plug to fit.
Drain leaks allow water to sneak around the outside of the drain where it's connected to the tub or shower. This is especially mutual with plastic or fiberglass tubs and shower pans, since these materials flex slightly when y'all stand up on them, frequently breaking the seal around the drain. These leaks can stain or destroy the ceiling below or rot floor joists. In the instance of a tub assault a concrete slab, the leak volition ruin flooring in the bathroom or adjoining rooms.
Signs of trouble bathtub drain leaking:
- H2o stains on the ceiling or joists beneath.
- Loose flooring almost the tub or damp floors in adjoining rooms (if the tub is on a concrete slab).
How to detect the source of a leaking tub drain:
- If you tin run into the underside of the drain through an admission console or open ceiling, partially fill the tub and and so release the h2o. In a shower, plug the bleed with a rag and so release the h2o. Check the drains and traps for leaks from beneath through the access panel.
- If you don't have access to the underside of the drain, plug the bleed and add enough water to form a small puddle around the drain (photo). Mark the border of the puddle by setting a canteen of shampoo next to it. Then wait an hour. If the puddle shrinks, the drain is leaking. Don't rely on your tub stopper for this test; it may leak. Remove the stopper and insert a 1-1/two-in. exam plug (find them at habitation centers). Remove the grate and use a 2-in. plug for a shower.
How to set a bathtub drain leaking:
- To repair a tub drain, unscrew the drain flange from above. Then clean the flange and apply silicone caulk. Also remove the rubber gasket that'southward under the tub's drain pigsty and take it to a home centre to find a matching gasket (be sure to become the correct size to fit). Slip the new gasket into identify and screw in the drain flange.
- If you have access to a shower drain from below, tighten the ring nut that locks the bleed to the shower pan. If that doesn't work, replace the drain assembly. If y'all don't accept access below the bleed, cut a hole in the ceiling below or replace the drain assembly with a WingTite drain.
Tub and shower: Tile leaks
Tile leaks occur when water seeps through deteriorating grout or caulk and gets into the wall behind the tile (Figure A). Depending on the materials used to set the tile, this can lead to tile falling off the wall, astringent rotting of the wall framing, and damage to the subfloor, joists or ceiling below.
Signs of trouble:
- Loose tiles.
- Persistent mold.
- If the shower is against an outside wall, you lot may find an area of peeling paint outside.
- Stains on the ceiling under the shower.
How to find the source:
- Examine the grout and caulk joints for gaps. Y'all almost always find mold here.
- If you accept loose tile behind the tub spout or faucet, open the access panel behind the faucet and look for dampness or stains.
How to set it:
- Remove the old grout, caulk and loose tiles.
- If the surface behind the tile is still solid, you can reattach tiles, regrout and recaulk using tub and tile caulk.
- If more a few tiles are loose or if the wall is spongy, you'll take to install new backer lath and tile, or a fiberglass surround.
Toilet flange leaks
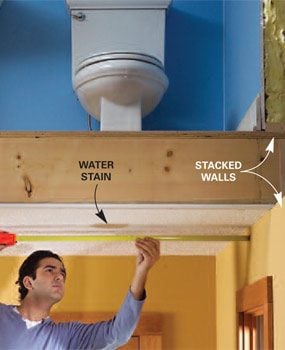
Photo ane: Locate the source
Take measurements from stacked walls to observe the source of a ceiling stain. In most cases, the stain occurs close to the source.

Photo 2: Check for flange leaks
Unscrew the toilet bolt basics and remove the toilet. Scrape away the wax and wait for leaks. Also check for cracks around the toilet'south horn.
These leaks occur where the toilet meets the waste material pipe below. They let water to seep out at every flush, which will wreck flooring, rot the subfloor and joists, and damage the ceiling below (Photo 1).
Signs of trouble:
- Water seeping out effectually the base of the toilet.
- Loose or damaged floor.
- Stains on the ceiling below.
- A toilet that rocks slightly when you push confronting it. This movement will somewhen break the wax seal betwixt the toilet and the cupboard flange.
How to find the source:
If you have ceiling stains, measure from stacked walls (right photograph) before yous go through the hassle of removing the toilet. If the stain is near the toilet, a leaking flange is the most likely source. Remove the toilet (Photo 2) and look for these leak sources:
- The flange is level with or below the surrounding floor surface.
- Cracks in the flange.
- Bolts or the slots they fit into are broken.
- The flange is loose, not screwed solidly to the subfloor.
How to fix it:
- If you don't find whatever of the bug listed higher up, reinstall the toilet with a new wax ring.
- If the flange is too low, install a plastic flange riser over the existing flange.
- If the flange or bolt slots are broken, install a metallic repair flange.
- If the toilet rocks because the floor is uneven, slip toilet shims under the toilet when you reinstall it.
Homeowner story:
"I had noticed the toilet rocking slightly for a few years, just I kept putting off the repair. So one day the ceiling under the toilet cruel in. It turned out that the wax band had been leaking for years. The subfloor around the toilet was rotted, and the more it rotted, the more the toilet rocked and the more h2o leaked out with every flush."
Figure B: Toilet Leaks
Toilet leaks can come up from the water supply or tank, just the virtually damaging leaks occur at the flange and wax ring.
Sinks: Sink rim leaks
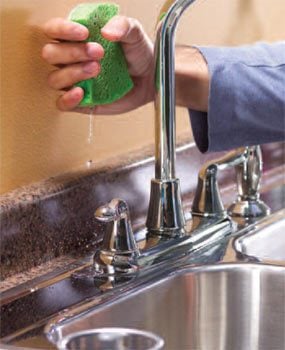
Test for rim leaks
Distill water around the sink rim and faucet base with a sponge. Then await for leaks below using a flashlight.
Sink rim leaks permit h2o to seep under the rim or the base of the faucet. They will gradually destroy your cabinets and countertops in kitchens and bathrooms.
Signs of trouble:
- Puddles, dampness or water stains within the cabinet.
- Loose plastic laminate near sink.
- A loose faucet base.
- Deteriorating caulk around sink.
How to observe the source:
- If y'all have a plastic laminate countertop, examine the underside of the countertop using a flashlight. Look for bloated particleboard or other signs of water harm.
- Dribble h2o around the sink rim and look for leaks (photo).
How to fix it:
- Tighten the faucet base by turning the mounting nuts underneath information technology.
- If the sink rim is caulked, scrape away the quondam caulk and recaulk.
- Tighten the clips nether the sink rim that clamp the sink to the countertop.
Homeowner story:
"The caulk around my cast atomic number 26 sink was in bad shape for years, but I didn't worry about it until the plastic laminate in front of the sink began to loosen. I stuck my head nether the sink and saw that the particleboard under the sink rim was black and swollen. When I poked at the rotten particleboard, it crumbled like charred wood. I had to supervene upon all my countertops at a price of $800. But I'grand glad the old countertop gave me a alert sign—with a few more months of rot, that 100-lb. sink could have fallen into the chiffonier beneath."
Figure C: Sink Leaks
Sink leaks can occur at any plumbing articulation. But the nigh common leaks happen at the sink rim, shutoff valves, supply line connections and slip joints in the waste matter lines.
Under Sink Plumping: Supply leaks
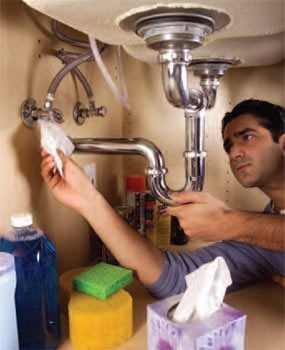
Check for supply leaks
Don't rely on your sense of touch to detect tiny nether sink plumbing leaks. Wipe each connection with a dry tissue. Then expect for a wet spot on the tissue.
Supply leaks nether the kitchen sink or bath vanity can become unnoticed for a long time since they're commonly at the dorsum of the chiffonier. Water can run down the pipes into the floor or subfloor, rotting the sink base, the floor and the framing.
Signs of nether sink plumbing trouble:
- Puddles, dampness or h2o stains under sink plumbing and inside the cabinet.
- Stains on the ceiling below.
How to observe the source:
- Dab shutoffs and connections with a dry tissue or newspaper towel and look for wet spots (photo).
- Run the dishwasher and cheque for leaks under it.
How to fix it:
- If the valve stem on a shutoff valve drips, tighten the packing nut. If the leak doesn't stop, replace the valve.
- For other leaks at the shutoff valve or at the faucet, attempt tightening the compression nut starting time. If that doesn't stop the leak, disassemble the fitting, coat the ferrule or gasket with Teflon joint compound (available at home centers and hardware stores) and reassemble the connection.
Sinks: Bleed leaks
Drain leaks in kitchens and bathrooms normally occur at the drain or at the slip joints in the drainpipe. Hidden behind boxes and bottles, these leaks tin can damage flooring, cabinets and fifty-fifty ceilings below before you notice them.
Signs of problem:
- Puddles, water stains or a dank odor in the cabinet.
- Loose or damaged flooring in front of the sink.
How to detect the source:
- Make full the sink bowls, and so as they drain check all joints from the sink to the wall with a dry tissue (see photo above).
- Run and drain the dishwasher and check the waste hose connection.
How to gear up it:
- For a slip joint leak, first tighten the slip nut. If that doesn't work, disassemble the articulation, glaze the washer with Teflon joint compound and reassemble.
- For a leak from the handbasket strainer, tighten the ring nut under the sink. If the leak continues, disconnect and remove the basket strainer. Reassemble it using plumber's putty every bit a sealant nether the basket's rim.
Two Slow Leaks That Point Catastrophe
If you notice puddles near your water heater, check the force per unit area relief valve and the drain valve. If either is dripping, supplant the valve. If not, the tank is leaking and you need a new water heater. Don't delay. Tank leaks often start slow and then suddenly burst days or weeks later, causing a major household overflowing. The same goes for washing car supply hoses. If y'all notice a tiny leak in the hose itself or at the crimped metal fittings at the ends, replace the hose. Otherwise the hose may somewhen outburst, releasing a continuous period of water.
Test for Hidden Leaks
The vast majority of leaks occur at or almost plumbing fixtures like tubs, sinks and toilets. But if y'all suspect a leak in the water supply organization, in that location'due south a simple way to bank check it— even if the pipes are hidden within walls. First, turn off all your faucets. If y'all have drippy faucets or a toilet that runs between flushes, close the shutoff valves. Then go to your water meter and check the position of the "one-cubic-pes" dial. Check the dial again two hours later. If the punch has moved, you have a leak in the water supply.
Required Tools for this Project
Accept the necessary tools for this DIY project lined up before you outset—you'll salve time and frustration.
Required Materials for this Projection
Avoid last-minute shopping trips by having all your materials ready ahead of time. Hither'due south a list.
Originally Published: Nov 25, 2022

How To Repair A Leak In Pvc Drain Pipe For Shower That Has No Acess To It ?,
Source: https://www.familyhandyman.com/project/find-and-repair-hidden-plumbing-leaks/
Posted by: davidsoncauz1972.blogspot.com
0 Response to "How To Repair A Leak In Pvc Drain Pipe For Shower That Has No Acess To It ?"
Post a Comment