

How To Repair The Inflation Valve On A Inflatable Boat
June 2022 – The flavor of weekends spent at body of water has already begun, and the time of the master summer holidays will soon kickoff. Many of us accept an inflatable boat on which we spend cute moments at sea or lake in the summer. Before each season, it is recommended to check the suitability of the boat already at home, and thus avoid inconveniences on holidays. Before you go out on the water with your boat, information technology is recommended to cheque if there is a puncture, leak, or any other problem concerning your inflatable boat. Minor problems tin can more often than not exist hands fixed, only larger ones may demand the assist of an expert. Either way, you will find the problem surface area on the gunkhole easier when you are still at home, rather than when you are already on the water with the gunkhole.
Breaking and leaking an inflatable boat is rare but can be problematic. Slow air leakage can be especially annoying if you cannot find the source of the problem. Finding a puncture or leak is non easy, it tin turn out to be like finding a needle in a haystack. With this simple trick, you will find the location of the leak very easily.
First, inflate the boat in a tranquillity and dry place and try to listen to the leak. If you hear any hissing and you tin narrow the area of hissing on the boat, you are on the right track. To decide the exact source of the leak, spray the hiss surface area with a spray canteen filled with lather. Leaking air will somewhen cause bubbles to course on the surface of the boat; if you notice bubbles forming in the area, it ways that a leak is as well coming from here. If yous cannot decide where the leak is coming from, spread the lather all over the boat with a large sponge and so wait for bubbles.
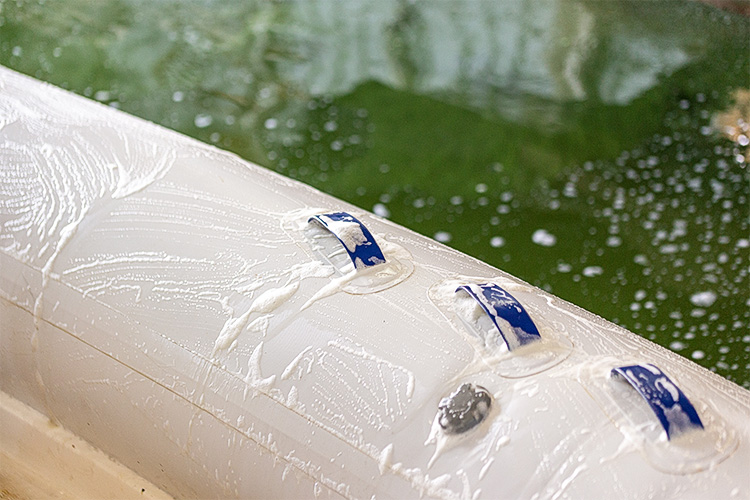
If y'all do non find any punctures on the boat, it means that air leaks tin be caused by poorly installed valves. To cheque this likewise, simply use soap effectually the valve and cheque for bubbles. Poorly installed valves are usually the main cause of slow leaks.
If the source of the leak is suspected to be a valve, check with a soap solution. Inflate the gunkhole, and then utilise the soap mixture around the valve and bank check for bubbling. Air can leak effectually the perimeter of the valve, the perimeter of the cover, or the entire expanse effectually the archway to the valve trunk. To figure out how to fix the trouble, you lot need to know which of these 3 parts is causing the leak.
If air leaks from around the valve, in that location is a high probability that the valve is poorly installed. In this case, remove the valve and clean the identify where information technology is inserted, and then put the valve dorsum in its identify and tighten it well.
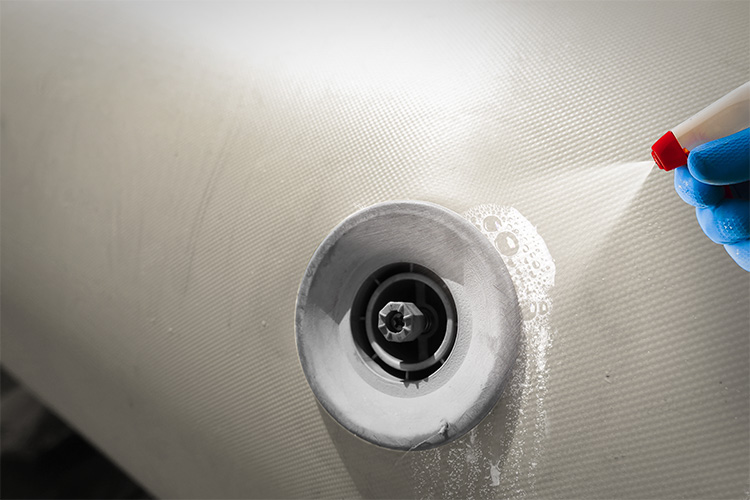
There is a possibility that clay will eventually accrue in the prophylactic sealing band of your inflatable boat. At that place is also the possibility of the safety sealing ring wearing out. Both result in slow air leakage from the valve circumference. The valve itself can also be to blame.
Unscrew the valve and clean it thoroughly. If dirt accumulates on the rubber sealing ring, you lot will need to accident the air valve with an air pump to remove it. Keep the air pump hose away from the unlocked key screw in the valve. Clay on the perimeter of the valve body can as well exist cleaned with a small amount. In this case, the valve is opened to allow the acetone to dry. If the rubber sealing band is worn out, yous volition need to replace it.
Of course, there is a possibility that there have been other punctures or leaks on your inflatable boat. We advise you to cheque this option besides. Nosotros can repair our punctured inflatable boat ourselves. Nosotros first need to figure out how big the leak is to how to fix it.
Punctures, or even damage that is 3 mm to 10 cm in size, will require patching. When you buy your inflatable boat, you normally receive a repair kit, otherwise, you can apply the following solution. Start, mark the area to exist repaired. Cut a piece of repair fabric that should be v cm larger than the impairment to the boat. This will cover the damaged surface area well. If you undertake the repair yourself, you must consider the material of the boat. There are inflatable boats made of rubberized and PVC reinforced marine canvas on the marketplace. Clean both surfaces well, sand them, and dust them earlier applying the adhesive. Prior to use, mix the adhesive with the appropriate amount of the prescribed hardener, which increases water resistance and elevated temperatures. Apply the adhesive, normally in two coats, to both surfaces to be bonded. Before the second application, the surface must be completely dry (25-30 minutes). After the 2nd awarding of mucilage, wait about 10 minutes and bring together the surfaces by pressing. Weigh the repaired surface for 24 hours with a weight between i and 2 kg. So utilise some other layer of gum to the edges of the patch to close it completely. Allow drying for at to the lowest degree half-dozen hours.
Nosotros recommend that yous perform the repair in dry weather. Humidity in the air can reduce the effectiveness of the adhesive bond.
Choice of glue:
- Rubberized canvases (eastward.grand. Hypalon) ……… Neostik TB + Hardener TB
- PVC sheets ……………………………………………. Neostik PU-S + Hardener Atomic number 26

Source: https://www.kemostik.com/news/how-to-find-and-eliminate-air-leaks-on-an-inflatable-boat/
Posted by: davidsoncauz1972.blogspot.com
0 Response to "How To Repair The Inflation Valve On A Inflatable Boat"
Post a Comment